Agents can be implemented using various GenAI (Generative AI) frameworks, including LangChain, LangGraph, LlamaIndex, and Semantic Kernel. All these frameworks support using Neon. Implementing AI-driven functions or tools calling required hundreds of lines of code—now, it takes just a few with the new Azure AI Agent Service. AI Agent Service is a part of Azure AI Foundry, and one can create agents without writing code or using Azure AI SDKs. An AI Agent works like a smart assistant that can answer questions, perform tasks, and automate workflows. It uses AI models from Azure OpenAI, external tools, and databases that help it access and interact with real-world data. Neon Serverless Postgres can be a knowledge tool for vector storage and semantic search in Azure AI Agent. In this article, we will discover how to use Neon with the Azure AI Agent service and demonstrate it with a sample project that interacts with your Neon projects, databases, and branching just by typing simple human-like commands.
Try out the Neon API Management AI Agent console app source code to see how it works!
Why Use Azure AI Agent Service with Neon?
Azure AI Agent Service is a fully managed solution that helps developers create, deploy, and scale AI agents without worrying about infrastructure. Azure AI Agent Service handles the entire tool-calling process by following three steps:
- Executing the model based on the given instructions
- Automatically calling the required tools, and
- Delivering the results back to you.
Key Features:
- Smart microservices: AI Agents can answer questions, execute functions, and automate workflows.
- Built-in tools: Access real-world data from Azure Search, Bing, and more.
- Seamless API integration: Use Azure AI Foundry SDK or OpenAI SDKs to create and run AI agents.
- Fully managed: No need to handle computing or storage manually.
Neon can store vector embeddings of documents and perform fast similarity searches. Using the pgvector extension, you can efficiently search and retrieve relevant data for AI models to enable more accurate and context-aware responses. One of Neon’s most shining features is database branching, which allows AI Agents to:
- Create separate environments for testing without affecting production.
- Experiment with AI models and data without risk.
- Quickly restore previous versions of the database.
Finally, Neon API provides full programmatic control over database creation, updates, and deletions. This is perfect for AI-driven workflows where databases need to be dynamically created for different AI agents or users.
Neon API Management AI Agent
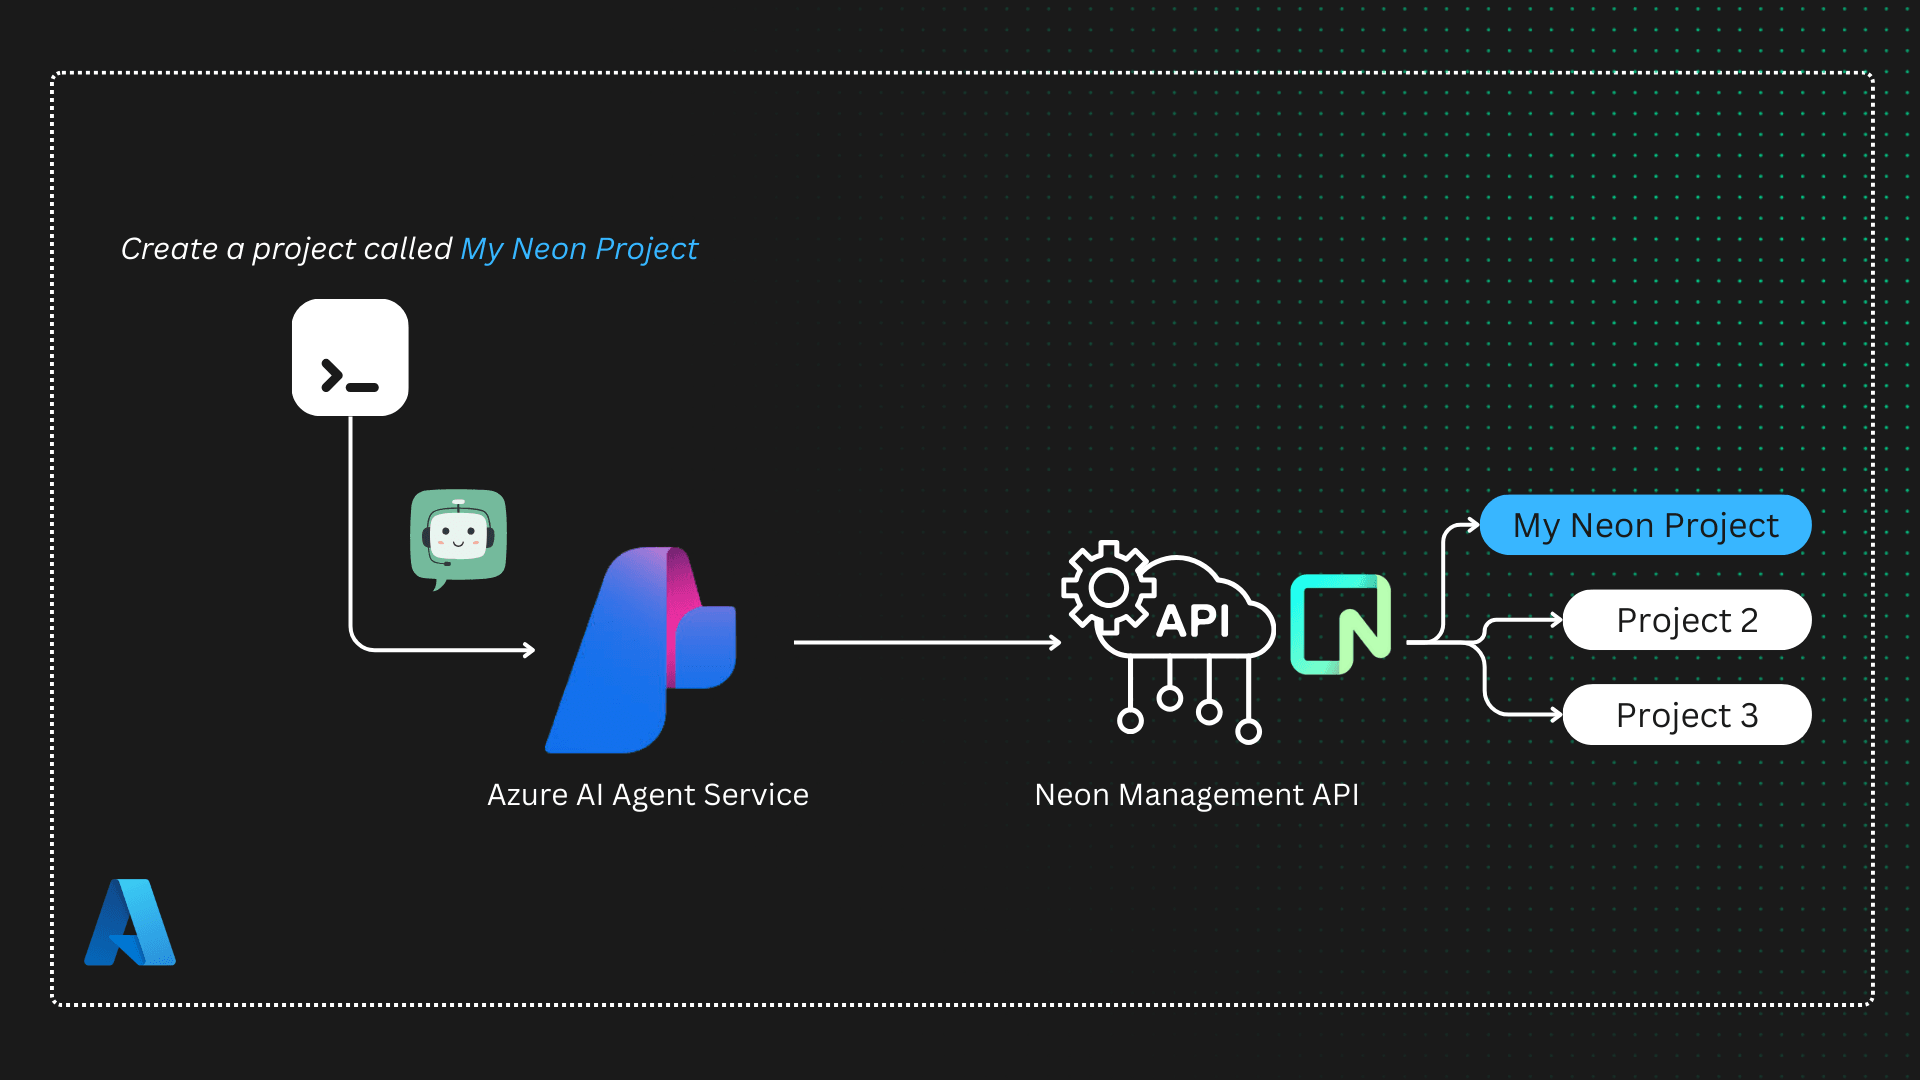
Once we understand why Neon is valuable for AI Agent Service, we can break down how to create, configure, and integrate an AI agent using the Neon API and Azure AI Agent Service.
Get Started with Azure AI Agent Service
To begin using Azure AI Agent Service, you first need to set up an AI Foundry hub and create an Agent project in your Azure subscription. If you’re new to the service, check out the quickstart guide for a step-by-step introduction.
Once your AI hub and project are created, you can deploy a compatible AI model, such as GPT-4o. After deploying the model, you’ll be able to interact with the service and make API calls using the available SDKs. In our example project, we used the Azure AI Projects client library for Python to create an agent, assigning Neon Management API functions and managing message threads.
Step 1: Create an AI Project Client
First, initialize an AIProjectClient using Azure credentials. This client is responsible for managing AI agents, threads, and interactions.
# neon_functions.py

project_client = AIProjectClient.from_connection_string(
    credential=DefaultAzureCredential(),
    conn_str=os.environ["PROJECT_CONNECTION_STRING"],
)
Step 2: Define Neon API Functions
Next, define the Neon API functions that the AI Agent will use. These functions allow the AI to perform database-related actions, such as creating a project, listing databases, and managing branches.
# ai-gent.py

neon = NeonAPI(api_key=os.environ["NEON_API_KEY"])

def create_project(project_name: str):
    try:
        response = neon.project_create(
            project={
                "name": project_name,
                "pg_version": 17,  # Fixed typo: removed extra colon
                "region_id": "azure-eastus2",
            }
        )

        return format_action_response(response)

    except Exception as e:
        return f"Error creating project: {str(e)}"

user_functions: Set[Callable[..., Any]] = {
    create_project
}
Step 3: Register Function Tools
Once the functions are defined, we register them as tools that the AI agent can call when processing user requests.
# ai-gent.py

functions = FunctionTool(user_functions)
toolset = ToolSet()
toolset.add(functions)
Step 4: Create the AI Agent
Now, we create an AI agent that understands database management tasks and can execute Neon API functions.
# ai-gent.py

agent = project_client.agents.create_agent(
    model=os.environ["AZURE_OPENAI_CHAT_DEPLOYMENT_NAME"],
    name=f"neon-db-agent-{datetime.now().strftime('%Y%m%d%H%M')}",
    description="AI Agent for managing Neon databases and running SQL queries.",
    instructions=f"""
    You are an AI assistant that helps users create and manage Neon projects, databases,
    and branches. Use the provided functions to perform actions.
    The current date is {datetime.now().strftime("%Y-%m-%d")}.
    """,
    toolset=toolset,
)
print(f"✅ Created agent, ID: {agent.id}")
Step 5: Create a Thread for User Interactions
The AI Agent needs a thread to interact with users. This thread stores all messages and interactions between the user and the AI.
# ai-gent.py

thread = project_client.agents.create_thread()
print(f"✅ Created thread, ID: {thread.id}")
Step 6: Process User Commands
When a user sends a command (e.g., “Create a Neon Project”), the AI agent processes it by creating a message, running the request, and returning a response.
# ai-gent.py

def process_command(command: str):
    message = project_client.agents.create_message(
        thread_id=thread.id,
        role="user",
        content=command,
    )
    print(f"✅ Created message, ID: {message.id}")

    run = project_client.agents.create_and_process_run(
        thread_id=thread.id, agent_id=agent.id
    )
    print(f"✅ Run finished with status: {run.status}")

    if run.status == "failed":
        print(f"❌ Run failed: {run.last_error}")
    else:
        messages = project_client.agents.list_messages(thread_id=thread.id)
        print(f"📜 Messages: {messages['data'][0]['content'][0]['text']['value']}")
Step 7: Accept User Commands
Finally, the program continuously listens for user input, allowing users to issue commands like “Create a database” or “List projects”.
# ai-gent.py

def main():
    while True:
        command = input("Enter a command (or 'exit' to quit): ")
        if command.lower() == "exit":
            break
        try:
            process_command(command)
        except Exception as e:
            print(f"❌ Error: {e}")

if __name__ == "__main__":
    main()
Conclusion
Throughout the article, we learned how to create a dedicated CLI interface that makes it easy for AI agents to deploy and manage database projects. AI agents are now creating more databases on Neon than humans, provisioning thousands of new databases every day. By connecting AI agents to Neon databases, agents can deliver more accurate, context-aware responses based on your data.
Ready to see it in action? Try out the Neon API & Azure AI Agent demo today!
Neon is a serverless Postgres platform that helps teams ship faster via instant provisioning, autoscaling, and database branching. We have a Free Plan – you can get started without a credit card.


